Posted on Leave a comment

Getting started with the Hammer Editor – With Hapreplu

Hammer is the map editor for Half-Life 2, allowing users to design levels and environments for it and other Source-engine games. Below is a quick guide to the basic controls and how to create a simple map with two rooms, a hallway, and a physics prop.

1. Basic Hammer Controls


Navigation:

  • Move Camera: Right-click and drag to pan.
  • Zoom In/Out: Mouse wheel.
  • Rotate Camera: Hold middle mouse button.

Selection Tools:

  • Select Object: Left-click on an object to select it.
  • Move Object: Select the object and use the arrow keys or drag it with the mouse.
  • Scale Object: Select the object, hold “Shift,” and scale using the handles.
  • Rotate Object: Select the object and press “Ctrl + E” to rotate.

Object Creation:

  • Create Brush: Use the “Block Tool” (Shift + B) to create a basic geometry shape (cube, wall, etc.).
  • Entity Tool: Press “Shift + E” to place entities like lights, spawn points, and props.

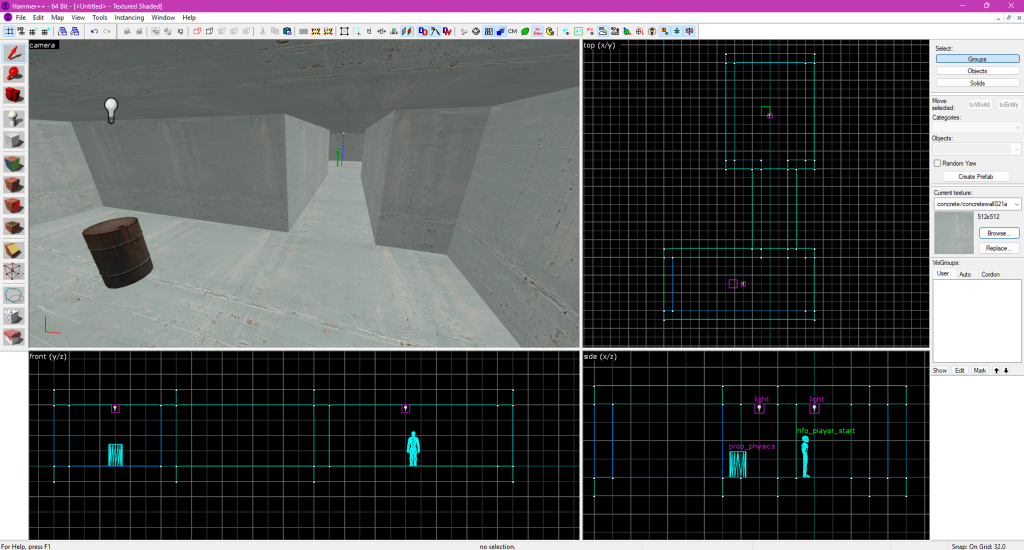
Views: Hammer has four default views—3D, top, side, and front. You can switch between these views with the tabs at the top of the editor.

2. Creating a Simple Map with Two Rooms and a Physics Prop

Step 1: Create the First Room

  1. Open Hammer and create a new map.
  2. Use the Block Tool (Shift + B) to create a simple rectangular brush (for the walls of the room). In the top, side, and front views, define the dimensions of the room.
  3. Select the brush and press Ctrl + T to convert it into a “func_detail” (so it doesn’t block visibility calculations).
  4. Add a Player Spawn entity: Press Shift + E, select “info_player_start” from the entity list, and place it in the first room.

Step 2: Add Lighting

  1. Place a light in the first room by selecting Entity Tool (Shift + E), choosing “light” from the list, and placing it inside the room.

Step 3: Create a Hallway and Second Room

  1. Use the Block Tool (Shift + B) to create a simple hallway leading into a second room. The hallway should connect to the first room via a door or opening.
  2. Define the dimensions of the second room as you did for the first one.

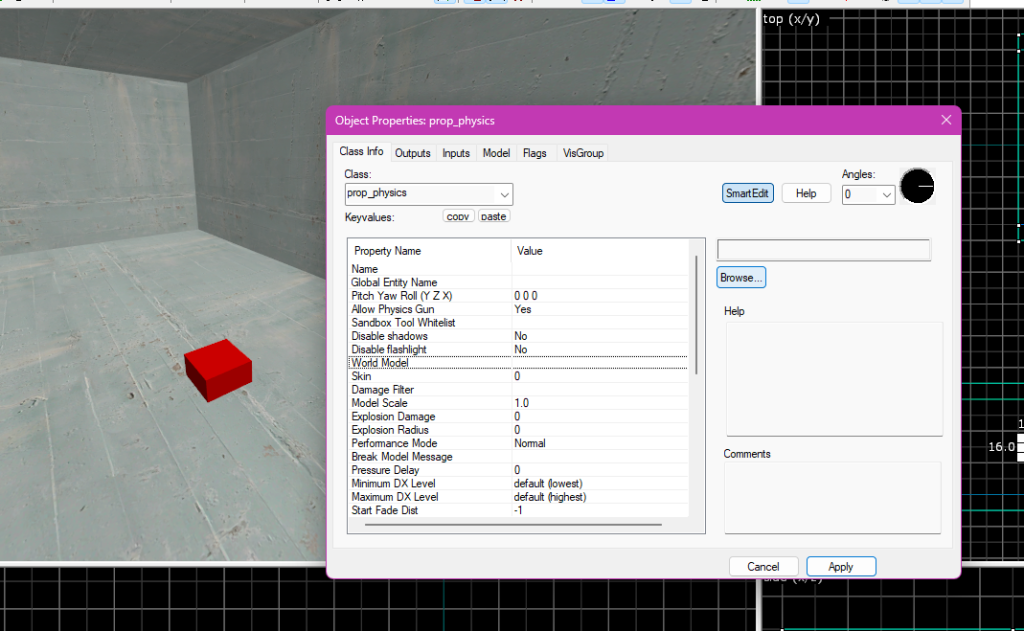
Step 4: Add a Physics Prop

  1. To place the oil drum prop, go to Entity Tool (Shift + E), select prop_physics, and choose the oil drum model (“models/props_c17/oildrum001.mdl”).
  2. Place the prop inside the second room and adjust its position.

Step 5: Sealing the Map

  1. Make sure all the brushes are sealed, and there are no gaps between the walls, ceiling, and floor.

Now, you have a basic map with a player spawn, light, a hallway, and a physics object (the oil drum). You can compile the map (F9) to test it in the game!

Posted on Leave a comment

Using the Lighting Preview Plugin – With Hapreplu

 When working in Hammer, achieving good lighting can be one of the most time-consuming parts of level design. Traditionally, you had to fully compile your map to see how light sources actually affect your environment, a process that could take several minutes or even hours for complex scenes. The Preview Lighting plugin completely changes this workflow by allowing you to visualize lighting directly in the editor, vastly quickening workflows that used to rely on repeated compiles.


Step 1: Enabling the Plugin

 First, open your map in Hammer and go to the plugins menu. From there, locate and enable the Preview Lighting plugin. Once active, you can enable the lighting preview mode by changing the camera type of the 3D viewport to, giving you access to lighting preview options.


Step 2: Setting Up Your Lights

 Place your standard Source engine light entities such as light, light_spot, and light_environment throughout your map. Adjust their brightness, color, and falloff radius as usual. The plugin reads these properties and uses them to generate a real-time approximation of how your lighting will appear after a full compile.

 For example the scene below is being lit with the preview lighting plugin:


Step 3: Using the Preview Mode

 Click the “Preview Lighting” button to enable the simulation. Your viewport will instantly refresh with a rough render of your lightmaps. This doesn’t represent the final baked lighting perfectly, but it’s accurate enough to judge brightness levels, color balance, and shadow placement without needing to compile. You can tweak lights interactively, move them, change values, and immediately see the results.


Step 4: Optimizing for Final Builds

 When you are happy with your scene’s look, you can perform a full lighting compile. Keep in mind that smaller lightmaps or more detailed lighting will produce higher-quality results but can also increase file size significantly. The preview helps you strike a balance early in development, saving countless compile iterations.


Step 5: Workflow Benefits

 By using the Preview Lighting plugin, you can refine your map’s atmosphere directly inside Hammer. It is an essential tool for anyone working in the Source pipeline who wants faster iteration, better control, and a much smoother lighting workflow overall.